Average Laptop Screen Repair Costs (2025 Pricing)
Laptop screen repairs range from $50 DIY to $600 professional. The cost depends on screen type, laptop brand, and whether you do it yourself. For detailed repair guides with photos and videos, check iFixit's laptop repair guides.
Screen repair costs vary wildly based on laptop brand, screen size, and whether you DIY or go professional. Here's what you'll actually pay:
| Brand | DIY Parts Cost | Professional Repair | Difficulty |
|---|---|---|---|
| Dell (XPS, Latitude) | $60-120 | $150-300 | Easy |
| HP (Pavilion, EliteBook) | $50-100 | $140-280 | Easy |
| Lenovo (ThinkPad, IdeaPad) | $70-130 | $160-320 | Medium |
| ASUS (ZenBook, ROG) | $55-110 | $145-290 | Easy-Medium |
| MacBook (Air, Pro) | $200-400 | $400-800 | Hard |
| Acer (Aspire, Swift) | $45-90 | $130-260 | Easy |
| MSI (Gaming laptops) | $80-150 | $180-350 | Medium |
Why the huge price difference? Professional repair includes labor ($80-150/hour), warranty, and shop overhead. DIY just costs parts plus your time.
💡 Cost-Saving Tip
Check if your laptop is under warranty first. Many manufacturers cover screen defects (not accidental damage) for 1-3 years. Dell and Lenovo business laptops often include accidental damage protection.
Types of Screen Damage (And What They Cost to Fix)
1. Cracked LCD - Most Common ($50-400)
Physical impact damage. You'll see cracks, black spots, or colorful lines spreading across the screen. The display might still work partially, but it's only getting worse.
Repair: Full screen replacement required. No way to fix a cracked LCD panel.
DIY Cost: $50-400 depending on laptop model
Professional Cost: $150-800
Time: 30-60 minutes DIY
2. Dead Pixels - Manufacturing Defect ($0-400)
Small dots that stay black, white, or stuck on one color. One or two dead pixels are annoying but not critical. Clusters of dead pixels make the screen unusable.

Repair: Usually covered under warranty if the laptop is less than 1 year old. Most manufacturers have a "dead pixel policy" (typically 3-5 dead pixels required for warranty replacement).
DIY Cost: $50-400 if out of warranty
Professional Cost: $0 under warranty, $150-800 if not
3. Backlight Failure - Screen Goes Dark ($30-150)
Screen is extremely dim or completely black, but you can barely see the image if you shine a flashlight on it. This means the backlight failed, not the LCD itself.
Repair: Replace backlight inverter (older laptops) or LED strip (newer laptops). Easier than full screen replacement.
DIY Cost: $30-100 for parts
Professional Cost: $120-250
Time: 45-90 minutes DIY
4. Loose Video Cable - Flickering Display ($0-50)
Screen flickers, goes black intermittently, or shows distorted colors. Often happens when you move the laptop lid.
Repair: Reseat the video cable connection. Sometimes just needs to be unplugged and reconnected firmly.
DIY Cost: $0 (just reseating), $15-30 if cable needs replacement
Professional Cost: $50-120
Time: 15-30 minutes DIY
5. Hinge Damage - Screen Won't Stay Open ($40-200)
Broken hinges can crack the screen bezel or damage the LCD. If the hinge is broken, fix it immediately before it damages the screen.
Repair: Replace hinges and potentially screen bezel
DIY Cost: $40-80 for hinges, $20-50 for bezel
Professional Cost: $150-300
DIY Laptop Screen Replacement: Complete Step-by-Step Guide
Tools You'll Need ($15-30 total)
- Precision screwdriver set ($8-15) - Phillips #0 and #00 are most common
- Plastic pry tools ($5-10) - Metal tools will scratch and crack plastic
- Anti-static wrist strap ($5) - Prevents static damage to electronics
- Tweezers ($3-5) - For handling small screws
- Magnetic parts tray ($5) - Don't lose those tiny screws
Finding the Right Replacement Screen
This is critical. Buy the wrong screen and it won't work. Here's how to find the exact match:
Method 1: Check the Screen Label
- Remove the screen bezel (we'll cover this below)
- Look for a label on the back of the LCD panel
- Note the model number (e.g., "LP156WF6-SPB1" or "N156HCA-EAB")
- Search that exact model number on eBay, Amazon, or LaptopScreen.com
Method 2: Use Your Laptop Model Number
- Find your laptop's exact model (usually on bottom sticker)
- Search "[laptop model] replacement screen" on eBay/Amazon
- Verify resolution, size, and connector type match
Critical specs to match:
- Screen size: 13.3", 14", 15.6", 17.3" (must be exact)
- Resolution: 1920×1080, 2560×1440, 3840×2160 (must match)
- Connector type: 30-pin, 40-pin, eDP (must match)
- Backlight: LED (standard), OLED (premium)
⚠️ OEM vs Aftermarket Screens
OEM (Original): Same manufacturer as your original screen. Best quality, higher price ($80-150).
Aftermarket: Third-party manufacturer. Good quality, lower price ($50-100). Slight color/brightness differences possible.
I've used both. OEM is worth it for premium laptops (MacBook, XPS). Aftermarket is fine for budget laptops.
Step 1: Backup Data and Power Down
Before touching anything:
- Backup important files (just in case)
- Shut down completely (not sleep mode)
- Unplug power cable
- Remove battery if possible (many modern laptops have internal batteries)
- Press power button for 10 seconds to discharge residual power
Step 2: Remove the Screen Bezel
The bezel is the plastic frame around the screen. This is the trickiest part—go slow to avoid cracks.
- Look for screw covers: Small rubber pads in the bezel corners hide screws. Pry them off gently with a plastic tool.
- Remove screws: Usually 4-8 small Phillips screws. Put them in your magnetic tray.
- Pry the bezel: Start at a bottom corner. Slide plastic pry tool between bezel and screen. Work your way around slowly. You'll hear clicks as plastic clips release.
- Don't force it: If it won't budge, there's a hidden screw somewhere. Check under rubber pads and stickers.
Pro tip: Take photos as you go. Makes reassembly way easier.
Step 3: Remove the Old Screen
- Locate mounting screws: Usually 4 screws (2 on each side) holding the LCD to the metal frame
- Remove screws: Keep these separate from bezel screws
- Tilt screen forward: Gently lay it face-down on the keyboard (put a soft cloth down first)
- Locate video cable: Ribbon cable connecting screen to motherboard, usually at the bottom center
- Disconnect cable: Most have a small plastic tab you lift up, then the cable slides out. Some have tape covering the connector—peel it off carefully.
- Remove old screen: Lift it away from the laptop
🔧 Connector Types
Slide-out: Lift the locking tab, cable slides out horizontally
Flip-up: Flip the connector up 90°, cable pulls straight out
Push-in: Press tabs on sides, cable pops out
Never force it. If it's not coming out easily, you're doing it wrong.
Step 4: Install the New Screen
- Compare old and new: Verify they look identical (size, connector position, mounting holes)
- Connect video cable: Slide cable into connector until it clicks. Lower the locking tab if applicable.
- Position screen: Align mounting holes with the metal frame
- Install mounting screws: Don't overtighten—you'll crack the screen. Snug is enough.
Step 5: Test Before Reassembling
Critical step: Test the new screen BEFORE snapping the bezel back on.
- Reconnect battery (if you removed it)
- Plug in power cable
- Power on the laptop
- Check for: Dead pixels, proper colors, even brightness, no flickering
- If something's wrong, it's easier to fix now than after reassembly
Step 6: Reassemble
- Power off again
- Position the bezel over the screen
- Press firmly around all edges until clips snap in
- Replace bezel screws
- Replace rubber screw covers
- Done!
When to Choose Professional Repair Instead
Screen repairs are expensive but often necessary. DIY saves money but requires skill. For other laptop repairs, check our overheating solutions and RAM upgrade guide.
1. MacBook Repairs
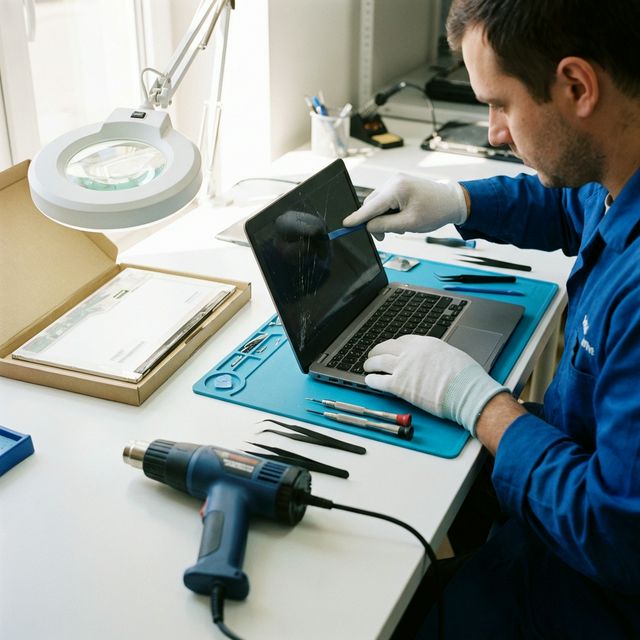
MacBooks are notoriously difficult. The screen is glued to the chassis, requires heat guns to remove, and uses proprietary connectors. Unless you're experienced, pay Apple or an authorized repair shop.
Apple Store cost: $400-800
Third-party repair: $300-500
2. Touchscreen Laptops
Touchscreens require calibration after replacement. DIY replacement often results in inaccurate touch response. Professional shops have calibration tools.
3. 2-in-1 Convertibles
Surface Pro, Yoga, Spectre x360—these have complex disassembly. High risk of breaking other components.
4. Under Warranty
Opening your laptop voids most warranties. If you're still covered, use it. Even if the damage isn't covered, sometimes they'll offer discounted repair.
5. You're Not Confident
If you're nervous about it, pay a professional. A botched DIY repair can turn a $150 fix into a $500 problem.
How to Choose a Repair Shop
Red flags (avoid these shops):
- No warranty on repairs
- Won't show you the replacement part before installing
- Prices significantly below market average (using cheap parts)
- No online reviews or all reviews are 5-stars (fake)
- Pressure you to decide immediately
Good signs (trustworthy shops):
- 90-day minimum warranty on repairs
- Certified technicians (A+, Apple Certified, etc.)
- Uses OEM or high-quality aftermarket parts
- Transparent pricing (written quote before work starts)
- Mix of 4-5 star reviews (all 5-stars is suspicious)
- Physical storefront (not just mobile repair)
Preventing Screen Damage
Screen Protectors - Do They Work?
Controversial topic. My take: Screen protectors don't prevent cracks from drops. They protect against scratches, that's it.
Laptop screens are glass or plastic. A screen protector is thin film. It won't stop impact damage. Save your money.
What Actually Prevents Damage
- Laptop sleeve: $15-30. Padded protection when in a bag.
- Hard-shell case: $20-40. Protects from drops and impacts.
- Don't put heavy items on closed lid: Books, other laptops, etc. This cracks screens.
- Close lid before moving: Open laptops get damaged easily.
- Avoid extreme temperatures: Don't leave in hot cars. LCD panels can delaminate.
Frequently Asked Questions
Final Recommendations
DIY if: You're comfortable with electronics, the laptop is out of warranty, and it's not a MacBook or touchscreen. You'll save $100-300.
Professional repair if: You're not confident, it's a MacBook/Surface/2-in-1, or it's under warranty.
Replace the laptop if: Repair costs more than 50% of the laptop's current value, or the laptop is 5+ years old with other issues.
I've replaced dozens of laptop screens. The first one took me 90 minutes and I was terrified. Now it takes 20 minutes. If I can do it, you can too.
Before you start, test your current screen for dead pixels to document the damage.