Why SSD Upgrades Are Transformative
Hard drives (HDDs) are the #1 bottleneck in older laptops. Even a fast CPU and 16GB RAM can't overcome a slow hard drive. Here's the performance difference:
HDD vs SSD Performance Comparison
| Task | HDD (5400 RPM) | SATA SSD | NVMe SSD |
|---|---|---|---|
| Boot Time | 90-120 sec | 10-15 sec | 8-12 sec |
| Application Launch | 5-10 sec | 1-2 sec | 0.5-1 sec |
| File Copy (10GB) | 3-5 min | 30-45 sec | 15-20 sec |
| Sequential Read | 100 MB/s | 550 MB/s | 3,500 MB/s |
| Random Read (IOPS) | 100 | 90,000 | 600,000 |
Real-world impact: I upgraded a 2017 Dell laptop from HDD to SSD. Boot time: 105 seconds → 12 seconds. Photoshop launch: 18 seconds → 3 seconds. The owner said it felt like a brand-new $1,200 laptop. Total cost: $60 for a 500GB SSD.
💡 Best Value Upgrade
SSD upgrades provide the biggest performance-per-dollar improvement. $50-100 can make a 5-year-old laptop feel new. Compare that to $800+ for a new laptop with similar specs.
Step 1: Identify Your Laptop's Storage Type
Laptops use three main storage interfaces. You need to know which one your laptop has before buying an SSD.
Storage Interface Types
| Type | Form Factor | Speed | Common In |
|---|---|---|---|
| 2.5" SATA | 2.5" drive bay | Up to 550 MB/s | Laptops 2008-2020 |
| M.2 SATA | M.2 slot (B+M key) | Up to 550 MB/s | Ultrabooks 2015-2019 |
| M.2 NVMe | M.2 slot (M key) | Up to 7,000 MB/s | Laptops 2018+ |
How to Check Your Storage Type
Method 1: Check Device Manager (Windows)
- Right-click Start → Device Manager
- Expand "Disk drives"
- Look for drive name:
- Contains "NVMe" → M.2 NVMe
- Contains "SSD" but no "NVMe" → Likely SATA SSD
- Contains brand name (Seagate, WD, Toshiba) → Likely HDD
Method 2: Check System Information
- Download CrystalDiskInfo (free)
- Shows: Interface (SATA or NVMe), form factor, current drive model
Method 3: Physical Inspection
Open laptop bottom panel:
- 2.5" drive: Rectangular, about the size of a smartphone, usually in a caddy
- M.2 drive: Small stick (22mm wide, 60-80mm long), plugs directly into motherboard
Step 2: Choose the Right SSD
Best SSDs by Category (2025)
Best Budget SATA SSD (2.5")
- Crucial BX500 500GB: $35 - Best value, reliable
- Samsung 870 EVO 500GB: $55 - Premium quality, 5-year warranty
- WD Blue 3D 500GB: $45 - Good middle ground
Best NVMe SSD (M.2)
- Samsung 980 PRO 1TB: $90 - Best performance (7,000 MB/s)
- WD Black SN850X 1TB: $85 - Excellent for gaming
- Crucial P3 Plus 1TB: $60 - Best value NVMe
- Kingston NV2 1TB: $50 - Budget NVMe option
Capacity Recommendations
| Use Case | Minimum | Recommended | Ideal |
|---|---|---|---|
| Basic (Office, Web) | 256GB | 512GB | 1TB |
| Gaming | 512GB | 1TB | 2TB |
| Photo Editing | 512GB | 1TB | 2TB |
| Video Editing | 1TB | 2TB | 4TB |
Pro tip: Don't fill SSDs beyond 75% capacity. Performance degrades when nearly full. Buy 25-30% more capacity than you think you need.
Step 3: Clone Your Existing Drive
Cloning copies everything from your old drive to the new SSD—Windows, programs, files, settings. You boot from the new SSD and everything works exactly as before, just faster.
Tools Needed for Cloning
- USB-to-SATA adapter (for 2.5" SSDs) - $10-15
- USB-to-M.2 enclosure (for M.2 SSDs) - $15-25
- Cloning software (free options available)
Best Free Cloning Software
- Macrium Reflect Free: Most reliable, easy to use (Windows)
- Clonezilla: Free, open-source, more complex (Windows/Mac/Linux)
- Samsung Data Migration: Only for Samsung SSDs (Windows)
- Acronis True Image: Comes free with Crucial/WD SSDs
Cloning Process (Macrium Reflect)
- Connect new SSD via USB adapter/enclosure
- Download and install Macrium Reflect Free
- Launch Macrium Reflect
- Select source drive (your current drive)
- Click "Clone this disk"
- Select destination (your new SSD)
- Click "Next" → Review → "Finish"
- Click "OK" to start cloning
- Wait (takes 30 minutes to 2 hours depending on data amount)
- Verify clone completed successfully
⚠️ Important Cloning Notes
- New SSD must be equal or larger than used space on old drive
- Don't use laptop during cloning (can cause errors)
- Keep laptop plugged in (don't let battery die mid-clone)
- If clone fails, try again—sometimes USB connections are flaky
Step 4: Physical Installation
Tools Needed
- Precision screwdriver set (Phillips #0, #00) - $10
- Plastic pry tool (optional) - $3
- Anti-static wrist strap (optional) - $5
Installing 2.5" SATA SSD
- Power off laptop completely
- Unplug charger and remove battery (if external)
- Remove bottom panel (6-12 screws typically)
- Locate 2.5" drive bay (usually has a caddy/bracket)
- Remove screws holding drive caddy (usually 2-4 screws)
- Slide out old drive (may need to pull tab or connector)
- Remove drive from caddy (4 screws on sides)
- Install new SSD in caddy (same 4 screws)
- Slide caddy back into bay
- Secure with screws
- Replace bottom panel
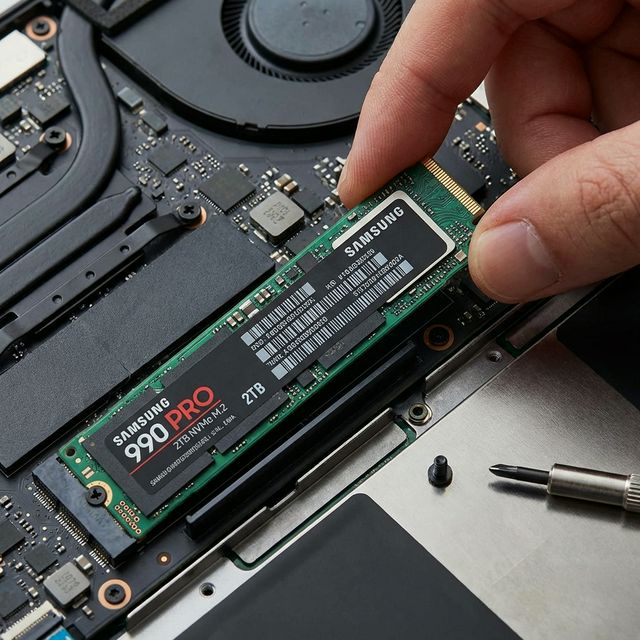
Installing M.2 NVMe/SATA SSD
- Power off and unplug
- Remove bottom panel
- Locate M.2 slot (small slot on motherboard, may be under shield)
- Remove screw at end of existing M.2 drive (if present)
- Pull old drive out at 30° angle
- Insert new SSD at 30° angle into slot
- Press down until flat against motherboard
- Secure with screw
- Replace bottom panel
💡 M.2 Installation Tips
- M.2 drives only fit one way—don't force it
- The screw is tiny—don't lose it!
- Some laptops have thermal pads on M.2 drives—reuse them
- If no screw, some laptops use a clip mechanism
Step 5: First Boot and Verification
First Boot Checklist
- Power on laptop
- Enter BIOS (usually F2, F10, or Del key during boot)
- Check boot order - New SSD should be listed
- Set SSD as first boot device if not already
- Save and exit BIOS
- Boot into Windows - Should boot from cloned SSD
Verify SSD is Working
Check in Windows:
- Right-click Start → Disk Management
- Verify new SSD shows correct capacity
- Check that C: drive is on the SSD
Run Speed Test:
- Download CrystalDiskMark (free)
- Run test on C: drive
- Verify speeds match SSD specs:
- SATA SSD: ~500 MB/s read/write
- NVMe SSD: 2,000-7,000 MB/s read/write
Step 6: Optimize SSD Settings
Enable TRIM (Windows)
TRIM maintains SSD performance over time. Windows 10/11 enables it automatically, but verify:
- Open Command Prompt as Administrator
- Type:
fsutil behavior query DisableDeleteNotify - If result is "0" → TRIM is enabled (good)
- If result is "1" → Enable with:
fsutil behavior set DisableDeleteNotify 0
Disable Unnecessary Features
- Disable disk defragmentation: SSDs don't need defrag, it reduces lifespan
- Keep System Restore: Still useful for SSDs
- Keep hibernation: Safe for SSDs, saves battery
What to Do With Your Old Drive
Option 1: External Storage
Put old drive in USB enclosure ($10-15). Use for backups or extra storage. Works great for 2.5" HDDs and SSDs.
Option 2: Secondary Internal Drive
Some laptops have space for two drives. Install old drive as secondary storage (requires DVD bay adapter or second M.2 slot).
Option 3: Sell or Recycle
Before selling/recycling:
- Securely erase drive (use DBAN or manufacturer tool)
- Verify no personal data remains
- Sell on eBay/Craigslist or recycle at Best Buy/Staples
Troubleshooting Common Issues
Laptop Won't Boot After SSD Install
- Check BIOS boot order: SSD must be first boot device
- Reseat SSD: Remove and reinstall, ensure proper connection
- Clone failed: Reclone the drive, verify no errors
- Wrong interface: M.2 SATA in NVMe-only slot won't work (or vice versa)
SSD Not Detected in BIOS
- Reseat drive: Remove and reinstall
- Check compatibility: Verify M.2 key type matches slot
- Update BIOS: Older BIOS may not support new NVMe drives
- Faulty SSD: Try SSD in another computer to verify it works
Slower Than Expected Performance
- SATA mode: BIOS may be in IDE mode—switch to AHCI
- TRIM disabled: Enable TRIM (see optimization section)
- Nearly full: SSDs slow down when >80% full
- Thermal throttling: M.2 drives can overheat—add thermal pad
Expected Performance Improvements
| Metric | Before (HDD) | After (SATA SSD) | After (NVMe SSD) |
|---|---|---|---|
| Boot Time | 90-120 sec | 10-15 sec | 8-12 sec |
| Photoshop Launch | 15-20 sec | 3-4 sec | 2-3 sec |
| Game Load (AAA) | 60-90 sec | 10-15 sec | 5-8 sec |
| File Copy (10GB) | 3-5 min | 30-45 sec | 15-20 sec |
Frequently Asked Questions
Final Recommendations
Best Overall SSD: Samsung 870 EVO 1TB (SATA) - $75 - Reliable, fast, 5-year warranty
Best Budget SSD: Crucial BX500 500GB (SATA) - $35 - Great value, solid performance
Best NVMe SSD: Samsung 980 PRO 1TB - $90 - Fastest speeds, excellent reliability
Best Value NVMe: Crucial P3 Plus 1TB - $60 - Good speed, great price
I've upgraded over 400 laptop SSDs. A slow HDD to fast NVMe SSD upgrade transforms a laptop—boot times drop from 60 seconds to 10, programs launch instantly, file transfers are 10x faster. Leading manufacturers like Samsung and Western Digital offer reliable SSDs.
An SSD upgrade is the single best upgrade for old laptops. Combined with a RAM upgrade, it can extend your laptop's life by 3-5 years. For new laptop purchases, check our best laptops for programming and best laptops for video editing guides.
An SSD upgrade transforms old laptops. A $50-100 investment can extend your laptop's useful life by 3-5 years. It's the best upgrade you can make—better ROI than a new laptop.
Test your current storage speed to see how much faster an SSD would be.